Search

25 July, 2016

Install Laravel with an Nginx Web Server on Ubuntu 14.04

Hello guys,today we have to learn about installing Laravel and Nginx on Ubuntu14.04. It's
very important to install it easy way because easy way optimize your time and it's easy
to memorize.Let's play with it. For Laravel you need to install composer,let's install
composer first.open your terminal (login your server by terminal) then just run
cd ~
curl -sS https://getcomposer.org/installer | php

This will create a file called composer.phar in your home directory. This is a PHP
archive, and it can be run from the command line.We want to install it in a globally
accessible location though. Also, we want to change the name to composer (without the
file extension). We can do this in one step by typing:
sudo mv composer.phar /usr/local/bin/composer
Now you can check composer by typing:
composer
It will show composer details.

The second step,installs Laravel globally on your system by typing:
composer global require "laravel/installer"
Make sure to place the ~/.composer/vendor/bin directory (or the equivalent directory for
your OS) in your PATH so the laravel executable can be located by your system.Type:
export PATH="~/.composer/vendor/bin/"
When you run this command restart your terminal. Now the laravel executable on your
system.
Now make a project by typing:
laravel new /var/www/laravel
Let's install the backend components that means install Nginx.First, we need to update
our local package and make sure you have a fresh list of the available packages. Then we
can install the necessary components:
sudo apt-get update
sudo apt-get install nginx php5-fpm php5-cli php5-mcrypt git

Now configure Nginx and the web root.Open the default server block configuration file
with sudo privileges and set our document root:
sudo nano /etc/nginx/sites-available/default
for laravel document root:
server {
listen 80 default_server;
listen [::]:80 default_server ipv6only=on;

root /var/www/laravel/public;
index index.php index.html index.htm;

server_name localhost;

location / {
try_files $uri $uri/ =404;
}
}

Because we modified the default server block file, which is already enabled, we simply
need to restart Nginx for our configuration changes to be picked up:
sudo service nginx restart
Now, the files are all installed within our /var/www/laravel directory, but they are
entirely owned by our root account. The web user needs partial ownership and permissions
in order to correctly serve the content.

We can give group ownership of our Laravel directory structure to the web group by
typing:
sudo chown -R :www-data /var/www/laravel

Next, we can change the permissions of the /var/www/laravel/app/storage directory to
allow the web group write permissions. This is necessary for the application to function
correctly:
sudo chmod -R 775 /var/www/laravel/storage
Thank's for reading......

Install Laravel with an Nginx Web Server on Ubuntu 14.04


Hello guys,today we have to learn about installing Laravel and Nginx on Ubuntu14.04. It's
very important to install it easy way because easy way optimize your time and it's easy
to memorize.Let's play with it. For Laravel you need to install composer,let's install
composer first.open your terminal (login your server by terminal) then just run
cd ~
curl -sS https://getcomposer.org/installer | php


This will create a file called composer.phar in your home directory. This is a PHP
archive, and it can be run from the command line.We want to install it in a globally
accessible location though. Also, we want to change the name to composer (without the
file extension). We can do this in one step by typing:
sudo mv composer.phar /usr/local/bin/composer
Now you can check composer by typing:
composer
It will show composer details.

The second step,installs Laravel globally on your system by typing:
composer global require "laravel/installer"
Make sure to place the ~/.composer/vendor/bin directory (or the equivalent directory for
your OS) in your PATH so the laravel executable can be located by your system.Type:
export PATH="~/.composer/vendor/bin/"
When you run this command restart your terminal. Now the laravel executable on your
system.
Now make a project by typing:
laravel new /var/www/laravel
Let's install the backend components that means install Nginx.First, we need to update
our local package and make sure you have a fresh list of the available packages. Then we
can install the necessary components:
sudo apt-get update
sudo apt-get install nginx php5-fpm php5-cli php5-mcrypt git

Now configure Nginx and the web root.Open the default server block configuration file
with sudo privileges and set our document root:
sudo nano /etc/nginx/sites-available/default
for laravel document root:
server {
listen 80 default_server;
listen [::]:80 default_server ipv6only=on;

root /var/www/laravel/public;
index index.php index.html index.htm;

server_name localhost;

location / {
try_files $uri $uri/ =404;
}
}

Because we modified the default server block file, which is already enabled, we simply
need to restart Nginx for our configuration changes to be picked up:
sudo service nginx restart
Now, the files are all installed within our /var/www/laravel directory, but they are
entirely owned by our root account. The web user needs partial ownership and permissions
in order to correctly serve the content.

We can give group ownership of our Laravel directory structure to the web group by
typing:
sudo chown -R :www-data /var/www/laravel

Next, we can change the permissions of the /var/www/laravel/app/storage directory to
allow the web group write permissions. This is necessary for the application to function
correctly:
sudo chmod -R 775 /var/www/laravel/storage
Thank's for reading......

29 June, 2016

SDLC

There are various software development approaches defined and designed which are used/employed during development process of software, these approaches are also referred as “Software Development Process Models” (e.g. Waterfall modelincremental modelV-modeliterative modelRAD modelAgile modelSpiral modelPrototype model etc.). Each process model follows a particular life cycle in order to ensure success in process of software development.
Software life cycle models describe phases of the software cycle and the order in which those phases are executed. Each phase produces deliverables required by the next phase in the life cycle. Requirements are translated into design. Code is produced according to the design which is called development phase. After coding and development the testing verifies the deliverable of the implementation phase against requirements. The testing team follows Software Testing Life Cycle (STLC) which is similar to the development cycle followed by the development team.
There are following six phases in every Software development life cycle model:
  1. Requirement gathering and analysis
  2. Design
  3. Implementation or coding
  4. Testing
  5. Deployment
  6. Maintenance
1) Requirement gathering and analysis:  Business requirements are gathered in this phase. This phase is the main focus of the project managers and stake holders. Meetings with managers, stake holders and users are held in order to determine the requirements like; Who is going to use the system? How will they use the system?  What data should be input into the system?  What data should be output by the system?  These are general questions that get answered during a requirements gathering phase. After requirement gathering these requirements are analyzed for their validity and the possibility of incorporating the requirements in the system to be development is also studied.
Finally, a Requirement Specification document is created which serves the purpose of guideline for the next phase of the model. The testing team follows the Software Testing Life Cycle and starts the Test Planning phase after the requirements analysis is completed.
2)  Design:  In this phase the system and software design is prepared from the requirement specifications which were studied in the first phase. System Design helps in specifying hardware and system requirements and also helps in defining overall system architecture. The system design specifications serve as input for the next phase of the model.
In this phase the testers comes up with the Test strategy, where they mention what to test, how to test.
3)  Implementation / Coding:  On receiving system design documents, the work is divided in modules/units and actual coding is started. Since, in this phase the code is produced so it is the main focus for the developer. This is the longest phase of the software development life cycle.
4)  Testing:  After the code is developed it is tested against the requirements to make sure that the product is actually solving the needs addressed and gathered during the requirements phase. During this phase all types of functional testing like unit testingintegration testingsystem testingacceptance testing are done as well as non-functional testing are also done.
5)  Deployment: After successful testing the product is delivered / deployed to the customer for their use.
As soon as the product is given to the customers they will first do the beta testing. If any changes are required or if any bugs are caught, then they will report it to the engineering team. Once those changes are made or the bugsare fixed then the final deployment will happen.
6) Maintenance: Once when the customers starts using the developed system then the actual problems comes up and needs to be solved from time to time. This process where the care is taken for the developed product is known as maintenance.


12 May, 2016

PRIME NUMBERS WITH IN THE GIVEN RANGE

#include<iostream>
#include<iomanip>
using namespace std;

int main(){
    int num,i,count,n;
    cout << "Enter max range: ";
    cin >> n;
    for(num = 1;num<=n;num++){
         count = 0;
         for(i=2;i<=num/2;i++){
             if(num%i==0){
                 count++;
                 break;
             }
        }
       
         if(count==0 && num!= 1)
              cout << num << setw(3);
    }
 system("pause");
   return 0;
}

Sort Elements in Lexicographical Order

#include<iostream>
#include <cstring>
using namespace std;
int main(){
    int i,j;
    char str[10][50],temp[50];
    cout << "Enter 10 words: " << endl;
    for(i=0;i<10;++i)
        cin.getline(str[i], 50);
    for(i=0;i<9;++i)
       for(j=i+1;j<10 ;++j){
          if(strcmp(str[i],str[j])>0)
          {
            strcpy(temp,str[i]);
            strcpy(str[i],str[j]);
            strcpy(str[j],temp);
          }
    }
    cout << "In lexicographical order: " << endl;
    for(i=0;i<10;++i){
       cout << str[i] << endl;
    }
return 0;
}

Enter 10 words:
fortran
java
perl
python
php
javascript
c 
cpp
ruby
csharp

In lexicographical order:
c
cpp
csharp
fortran
java
javascript
perl
php
python
ruby

11 May, 2016

Cache memory

A Cache (Pronounced as “cash”) is a small and very fast temporary storage memory. It is designed to speed up the transfer of data and instructions. It is located inside or close to the CPU chip. It is faster than RAM and the data/instructions that are most recently or most frequently used by CPU are stored in cache.
The data and instructions are retrieved from RAM when CPU uses them for the first time. A copy of that data or instructions is stored in cache. The next time the CPU needs that data or instructions, it first looks in cache. If the required data is found there, it is retrieved from cache memory instead of main memory. It speeds up the working of CP

26 April, 2016

Important programming concept for exam

C++ virtual function:
http://www.learncpp.com/cpp-tutorial/122-virtual-functions/

26 March, 2016

BB Question 2012

Q. 

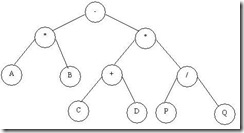
Q. Draw a binary Tree for the expression : A * B – (C + D) * (P / Q)

What is DNS, why it is important and how it works


The Domain Name System (aka DNS) is used to resolve human-readable hostnames like www.Dyn.com into machine-readable IP addresses like 204.13.248.115. DNS also provides other information about domain names, such as mail services.

But why is DNS important? How does it work? What else should you know?

Why is DNS important?

DNS is like a phone book for the Internet. If you know a person’s name but don’t know their telephone number, you can simply look it up in a phone book. DNS provides this same service to the Internet.
When you visit http://dyn.com in a browser, your computer uses DNS to retrieve the website’s IP address of 204.13.248.115. Without DNS, you would only be able to visit our website (or any website) by visiting its IP address directly, such as http://204.13.248.115.

How does DNS work?


When you visit a domain such as dyn.com, your computer follows a series of steps to turn the human-readable web address into a machine-readable IP address. This happens every time you use a domain name, whether you are viewing websites, sending email or listening to Internet radio stations like Pandora.
Step 1: Request information
The process begins when you ask your computer to resolve a hostname, such as visiting http://dyn.com. The first place your computer looks is its local DNS cache, which stores information that your computer has recently retrieved.
If your computer doesn’t already know the answer, it needs to perform a DNS query to find out.
Step 2: Ask the recursive DNS servers
If the information is not stored locally, your computer queries (contacts) your ISP’s recursive DNS servers. These specialized computers perform the legwork of a DNS query on your behalf. Recursive servers have their own caches, so the process usually ends here and the information is returned to the user.
Step 3: Ask the root nameservers
If the recursive servers don’t have the answer, they query the root nameservers. A nameserver is a computer that answers questions about domain names, such as IP addresses. The thirteen root nameservers act as a kind of telephone switchboard for DNS. They don’t know the answer, but they can direct our query to someone that knows where to find it.
Step 4: Ask the TLD nameservers
The root nameservers will look at the first part of our request, reading from right to left — www.dyn.com — and direct our query to the Top-Level Domain (TLD) nameservers for .com. Each TLD, such as .com, .org, and .us, have their own set of nameservers, which act like a receptionist for each TLD. These servers don’t have the information we need, but they can refer us directly to the servers that do have the information.
Step 5: Ask the authoritative DNS servers
The TLD nameservers review the next part of our request — www.dyn.com — and direct our query to the nameservers responsible for this specific domain. These authoritative nameservers are responsible for knowing all the information about a specific domain, which are stored in DNS records. There are many types of records, which each contain a different kind of information. In this example, we want to know the IP address for www.dyndns.com, so we ask the authoritative nameserver for the Address Record (A).
Step 6: Retrieve the record
The recursive server retrieves the A record for dyn.com from the authoritative nameservers and stores the record in its local cache. If anyone else requests the host record for dyn.com, the recursive servers will already have the answer and will not need to go through the lookup process again. All records have a time-to-live value, which is like an expiration date. After a while, the recursive server will need to ask for a new copy of the record to make sure the information doesn’t become out-of-date.
Step 7: Receive the answer
Armed with the answer, recursive server returns the A record back to your computer. Your computer stores the record in its cache, reads the IP address from the record, then passes this information to your browser. The browser then opens a connection to the webserver and receives the website.

This entire process, from start to finish, takes only milliseconds to complete.

21 March, 2016

Type of Algorithms

Divide and conquer algorithms
  • Binary Search
  • Quick Sort
  • Merge Sort
  • Integer Multiplication
  • Matrix Multiplication (Strassen's algorithm)
  • Maximal Subsequence 
Dynamic Programming
• String Reconstruction
• Longest Common Subsequence
• Edit Distance
• Subset Sum

Greedy Algorithm
  • Kruskal’s Minimum Spanning Tree (MST):
  • Prim’s Minimum Spanning Tree
  • Dijkstra’s Shortest Path
  • Huffman Coding


11 February, 2016

Linux command

Change file permission:
sudo chmod -R 777 /var/www

04 February, 2016

Python

Class object:
file name media.py
##############
import webbrowser


class Movie():
    def __init__(self, movie_title, movie_storyline, poster_image,                  
                 trailer_youtube):
        self.title = movie_title
        self.storyline = movie_storyline
        self.poster = poster_image
        self.trailer = trailer_youtube

    def show_trailer(self):
        webbrowser.open(self.trailer)
#############
trailller.py
import class_object

movie_story = class_object.Movie("Toy story", "something missing", "image url ", 
                                 "youtube.com")

print(movie_story.storyline)
movie_story.show_trailer()

###################

Read from url:
def read_web_page():
    connection = urllib.request.urlopen(
                 "http://manozbiswas.blogspot.com/2016/02/nice-drawing-in-python.html")
    output = connection.read()
    print(output)
    connection.close()


read_web_page()
#################
Read from file:
def readText():
    quotes = open(r"C:\Users\manoz debnath\Desktop\py\hello.txt")
    contents = quotes.read()
    print(contents)
    quotes.close()


readText()
######################
Drawing image:
import turtle


def drawSquare(some_turtle):
    for i in range(1, 5):
        some_turtle.forward(100)
        some_turtle.right(90)

def drawArt():
    window = turtle.Screen()
    window.bgcolor("red")
    # Create the turtle Brad -Draws square    brad = turtle.Turtle()
    brad.shape("turtle")
    brad.color("yellow")
    brad.speed(2)
    for i in range(1,37):
        drawSquare(brad)
        brad.right(10)
    #Create turtle Angie - Draws a circle 
    # angie = turtle.Turtle() 
    # angie.shape("arrow") 
    # angie.color("blue") 
    # angie.circle(100)
    window.exitonclick()

drawArt()

#######################


Draw a square with a circle:

#################
import turtle


def drawSquare():
    window = turtle.Screen()
    window.bgcolor("red")

    brad = turtle.Turtle()
    brad.shape("turtle")
    brad.color("yellow")
    brad.speed(2)

    brad.forward(100)
    brad.right(90)
    brad.forward(100)
    brad.right(90)
    brad.forward(100)
    brad.right(90)
    brad.forward(100)
    brad.right(90)

    angie = turtle.Turtle()
    angie.shape("arrow")
    angie.color("blue")
    angie.circle(100)

    window.exitonclick()

drawSquare()

###################


03 February, 2016

Challenge and Mistakes in ERP Implementation

 7 Common Challenges Faced in ERP Implementation :
It is very important, that implementation is done in stages. Trying to implement everything at once will lead to a lot of confusion and chaos.
  1. Appropriate training is very essential during and after the implementation. The staff should be comfortable in using the application or else, it will backfire, with redundant work and functional inefficiencies.
  2. Lack of proper analysis of requirements will lead to non-availability of certain essential functionalities. This might affect the operations in the long run and reduce the productivity and profitability.
  3. Lack of Support from Senior Management will lead to unnecessary frustrations in work place. Also, it will cause delay in operations and ineffective decisions. So, it is essential to ensure that the Senior Management supports the transformation.
  4. Compatibility Issues with ERP Modules lead to issues in integration of modules. Companies associate different vendors to implement different ERP modules, based on their competency. It is very essential that there is a way to handle compatibility issues.
  5. Cost Overheads will result, if requirements are not properly discussed and decided during the planning phase. So, before execution, a detailed plan with a complete breakdown of requirements should be worked out.
  6. Investment in Infrastructure is very essential. ERP applications modules will require good processing speed and adequate storage. Not allocating suitable budget for infrastructure will result in reduced application speed and other software issues. Hardware and Software Security is also equally important.
13 Common ERP Mistakes and How to Avoid Making Them
  1. RP Mistake #1: Poor planning 
  2.  ERP Mistake #2: Not properly vetting ERP vendors.
  3. ERP Mistake #3: Not understanding or using key features.
  4. ERP Mistake #4: Underestimating the time and resources required.
  5. ERP Mistake #5: Not having the right people on the team from the start
  6.  ERP Mistake #6: Not setting priorities
  7.  ERP Mistake #7: Not investing in training and change management. 
  8.  ERP Mistake #8: Underestimating the importance of accurate data
  9.  ERP Mistake #9: Taking the kitchen sink approach.
  10.  ERP Mistake #10: Not decommissioning legacy applications.
  11. ERP Mistake #11: Not having an active load testing environment
  12. ERP Mistake #12: Ignoring third-party support alternatives 
  13.  ERP Mistake #13: Not having a maintenance strategy.


E-R Diagram

E-R Diagram: Best Design
An entity–relationship diagram using Chen's notation
Symbols:

Derived attributes are depicted by dashed ellipse.


 Cardinality Relationship:


Relationship with foreign key


Participation Constraints

  • Total Participation − Each entity is involved in the relationship. Total participation is represented by double lines.
  • Partial participation − Not all entities are involved in the relationship. Partial participation is represented by single lines.


Generalization:Generalization is a bottom-up approach in which two lower level entities combine to form a higher level entity. In generalization, the higher level entity can also combine with other lower level entity to make further higher level entity
Specialization:Specialization is opposite to Generalization. It is a top-down approach in which one higher level entity can be broken down into two lower level entity. In specialization, some higher level entities may not have lower-level entity sets at all.

Aggregration: Aggregration is a process when relation between two entity is treated as a single entity. Here the relation between Center and Course, is acting as an Entity in relation with Visitor.